Make a quilted pouch with me using the smallest fabric scraps you own, batting / wadding, a couple of layers of tulle or mesh fabric and some quilting cotton to use as lining. Are you ready? :)
Step-by-step quilted pouch tutorial
Materials needed
These are the materials I used to make my pouch. The dimensions are totally up to you :)
- Plenty of 'dog-ears' from making Half-Square Triangles or small scraps. You can use bigger scraps as well. Your choice!
- Wadding / batting.
- Batting spray for quilting or temporary spray fabric glue.
- Quilting cotton for the lining.
- Zipper.
- Thread for quilting and regular thread for sewing the pouch together.
- Optional label.
- The usual sewing and quilting tools: pins, rotary cutter and cutting mat, quilting ruler, unpicker, fabric scissors, fabric marking tools...
The steps
1. Spray some of your batting / fabric glue spray on to one of the two layers of wadding / batting. Do this with the window open or outside if possible. Follow the instructions on your chosen spray brand.


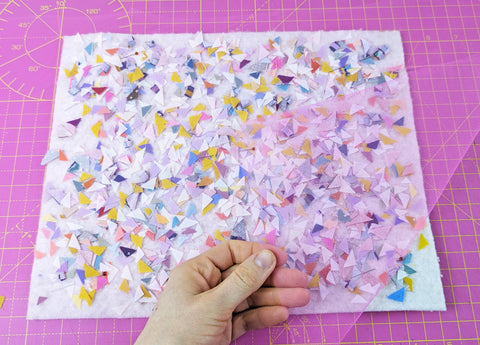
2. 'Sprinkle' your tiny scraps or, in my case, the 'dog-ears' I have been collecting from quite some time after making plenty of Half-Square Triangles for different projects. These tiny triangles are the result of triming the corners of your HSTs :) You can use bigger scraps or any scraps that you have around.
The fabric will stick to your wadding as you have used the spray on it.

3. Place the first layer of tulle on top of the wadding + 'dog-ears'. I chose a fluor / neon pink. I then pin it in place.
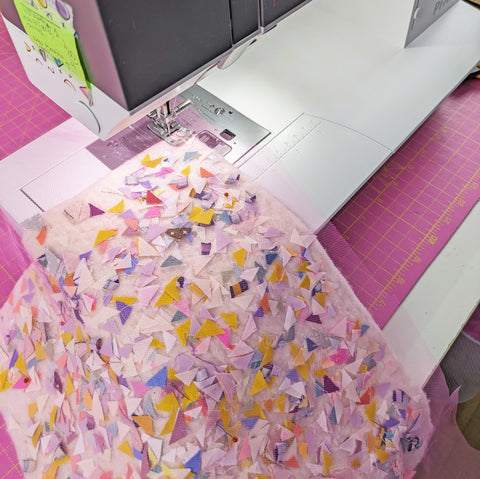
4. With your walking foot on your machine (or, like in my case, the IDT System on my Pfaff that works like a walking foot), quilt the two layers with the fabric scraps in between. I opted for vertical straight lines first, using a variegated thread that I usually use for quilting when I want something a bit different.

5. Then, place the second layer of tulle on top and pin again. I used two layers so that I could see the colour of the tulle better.

6. This time, I went for horizontal lines to create a grid design.

7. Repeat this same process with the other outer layer of your pouch. You can also trim the sides to make them straight if necessary using a quilting ruler, rotary cutter and cutting mat.


8. Now, for the pouch construction. I love adding zipper ends to my pouches for a more professional finish :) I always make my zipper 1cm on each side smaller than the width of my pouch and add the tabs.
After sewing them in place and cutting the extra, I am ready to assemble the pouch.


9. Place your zipper (with the tab ends sewn) with the right side facing down on top of the outer layer, which is facing the right side up as shown below. Then, place one of your lining layers on top of the zipper and the outer layer with the right side facing down.
Pin the three layers together along the top making sure your zipper is centered, leaving 1cm at either side free. Then, with a zipper presser foot on your machine, sew a straight line.


This is how it will look with one side of the zipper sandwiched and stitched in place in between outer and lining.

10. Now, you need to repeat the same steps but with the other side of the zipper, the other top layer of your pouch and the remaining lining piece.


11. Press your pouch next to your zipper on both sides to make sure that it lays flat and checking that the lining underneath is also pressed properly. Topstitch along the two sides of the zipper on the outer layer part.


12. With right sides together, lining against lining and outer layer facing the other outer layer, and with your zipper open half way, pin all around. Sew using a 1cm seam allowance and leave a gap on the lining of around 5cm to turn the pouch right side out.
Here you can also add a visible label to one of the side seams.

13. Turn the pouch through the gap on the lining and then turn it again through the open zipper.

14. And voilà! You've got a super cute quilted pouch using tiny scraps and tulle fabric! :)


I hope you liked this post and that you will try and make this super easy pouch :)
Thanks for reading and happy sewing!
Ana
xxx